Search This Blog

Monday, June 10, 2013

My Lipstick Movie Moment

Have you ever had one of those moments where something happens to you and you think, If I were in a movie, this is the part where background music would play. I have lots of those moments in my life. I'm a big movie buff, and I tend to dabble on the dramatic side. Here's a movie moment that coincided with my favorite new lipstick technique. Stay with me.

Every girl has a tube of lipstick, right? You may not wear it everyday, but you at least have one for special occasions. Check your lipstick. What color do you have? Now I have more than one tube of lipstick, but my go-to color is pink. I have many versions of pink lipstick; bright pink, light pink, pale pink, dark pink, the list goes on. Often when I'm looking for new lipstick I think, I need a new color, and I proceed to look at the same old pinks. Probably because aside from pink and nude, I don't know how to wear other colors. Peach and orange can be tricky to wear depending on your skin tone, and while I love purple, I have never had the courage to wear it.

Until a few weeks ago.

Once again I was strutting through Macy's (not a movie music moment) and I stopped at the MAC counter (the lights, colors and fabulousness of it all sucks me in, every time).  On this day, I stood in front of the lipstick display, wanting something different and testing at least 12 colors on my hand. All of which were pink.

Another MAC angel with beautiful, shimmery, high cheek bones approached me. His name was Zac. I told him I wanted a different lipstick. He suggested two colors that I already had (pink). But there, in the middle of all of those tubes of colors, was this lovely, lavender. It was entirely too bright, almost doll-like, the kind Barbie would wear, and not suitable for everyday. The kind I never had the guts to try. Its name was Up the Amp, and the irony was not lost on me. I had to try it. Zac took it out, cleaned it off and encouraged me to put it on. So I did what every normal girl would do, I swiped it heavily on both my lips. It looked like this:


(Disclaimer: Lips really are as large as they appear and taking pictures of your lips is hard. Capturing the correct color of the lipstick with bad lighting is harder. So while you may not see a big difference, trust me and trust Zac, in person, there is.)


Zac rolled his eyes at me and said, "Let's get a lip liner."

Here we go with the up-sell, I thought. He's gonna get me lip liner and a gloss (I hate lip gloss) and encourage me to buy all three.

"Wipe that off, " he said, handing me a moist towelette. In his hands he had - what did I tell you - not just a lip liner, but a gloss as well. He proceeded to line and color in my entire top lip with the liner, called Plum, which was darker than the lip stick. Then he lined just the sides of my bottom lip. Just the sides? Not the whole lip? I was confused. "Trust me," he said.

He handed me the lipstick and instructed me to gently pat the color only on my lower lip, no swiping, and rub my lips together. In my head I was like, huh? but I did as I was told. He then handed me this shimmery, pinky gloss, called Nymphette.

"This is my favorite gloss ever," he told me. "Now dab a little bit of this on your lower lip and just press your lips together once."

I obliged.

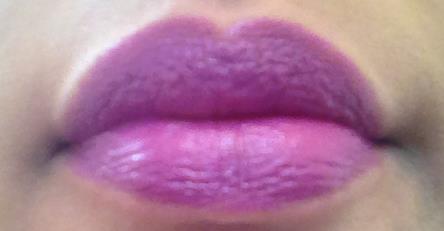
"GORGEOUS!" was his response. It looked like this:


I was amazed. I never would have put these colors together, never would have lined my lips they way he instructed, never would have worn the gloss. It was subtle, beautiful, and not pink.

"OK," I sighed. "I'll take all three."

Sucker, my inner-Deanna said.

After I left MAC with my gorgeous, new purple lips, I went to Sephora, MAC's arch nemesis, for some facial wash. As I was leaving the store, one of their makeup experts was standing at the makeup vanity in the front of the store. As I passed her, she said, "Your lipstick looks gorgeous."

I thanked her and tossed my head back, laughing as I walked out.

Que the music.


Do you have any lipstick tricks like this? Share your tips below or try this technique and let me know how it works for you!

Also, CLICK HERE for another awesome lip liner/gloss trick from my favorite blog, Makeup Geek!

Tuesday, June 4, 2013

Loved it, tried it! My first attempt at recreating a look I love!

Hello, dahlings! A couple of weeks ago, I posted the link to one of my favorite makeup blogs, The Beauty Bybel. Check it out on my new blog roll on the right side of the page. I just added it this week. (I'm starting to get the hang of of this here blogging thingy!) Carli Bel also has an extensive video collection on YouTube, where she demonstrates how to achieve certain makeup looks.  She has inspired me to come up with the segment of my blog entitled: Loved It, Tried It.  Periodically, I will try to recreate looks that I love based on pictures or videos that I see. Hopefully they will not turn out to be like the epic fails on Pinterest. You know the stuff that people try at home because Pinterest makes it look so easy, but instead it looks like this:
 
 
Let's hope I have some better luck.
 
For this week's look, I posted a link to Carli's video below. I know this is more of a look to wear in the fall, with the gold and brown, but I wanted to try it out and see if I could do this.While I did not use all the exact same products that she used, (I made due with some things I already have), I did follow her instructions step by step. I will list the products that I used below, and after that you can see my first video I have ever done, showing you the results.

View Carli's video here.

In order to recreate this look, I used the following items:


Maybelline EyeStudio Quad in Give Me Gold
MAC Eye Shadows from left to right: Black Tied, Bamboo, Nylon
Revlon Photoready Eye Primer and Brightener
Loreal Voluminous Carbon Black Mascara
Milani Shadow Eyez in Green Safari
Maybelline Eyestudio Gel Eyeliner in Blackest Black

First I primed my eye lid with Revlon's Photoready Eye Primer and Brightener. I sometimes wear this even when I don't wear eyeshadow, because it does brighten up around my eyes and helps hide my dark circles. Just like Carli, I used the Maybelline Eyestudio quad in Give me Gold. I used the gold color all over my lid. Following her steps, in the crease I used MAC's eye shadow in Bamboo. Then I used MAC's eye shadow, Black Tied in the outer "v" crease, instead of the black eye shadow pencil she used. I then used the bronze color from the Maybelline quad in my crease to blend. I then used MAC's Nylon eye shadow to highlight my tear duct and brow bone. I did not add any additional gold sparkle or the fake eye lashes, although I'm a huge fan of eye lashes. I think they really add drama to the eyes and I always wear them for special occasions.  Instead of the green eye shadow, I used Milani's Shadow Eyez pencil in green safari, I drew it on my lower lash line and blended it with an angled brush. Maybelline's Eyestudio Gel Eyeliner was used on my upper lids.
 
My thoughts on the outcome? I have to say, it looks much better in person than it does on my video below. I don't think you really get to see the green on my lower lids, but I think that is because of the lighting - something I'll have to work on for future videos. The look was easy to achieve, and like Carli mentions in her video, more appropriate for a night out. And I definitely need to get some glittery pigments for that extra sparkle. So check it out and let me know what you think!

See my final look here