
Tuesday, November 26, 2013
Sunday, November 24, 2013
Now on Bloglovin'
<a href="http://www.bloglovin.com/blog/11282273/?claim=7najss2zuq5">Follow my blog with Bloglovin</a>
Good morning, faccia bellas! I'm getting ready to head out to see The Hunger Games: Catching Fire with some of my besties, but I wanted to let you all know that now you can also find me on Bloglovin.com! I'm trying to build my faccia bella followers a little bit at a time. New post coming soon - I hope everyone has a great day!
Good morning, faccia bellas! I'm getting ready to head out to see The Hunger Games: Catching Fire with some of my besties, but I wanted to let you all know that now you can also find me on Bloglovin.com! I'm trying to build my faccia bella followers a little bit at a time. New post coming soon - I hope everyone has a great day!
Sunday, November 17, 2013
Step out and pout this holiday season
Hello, bellas! I'm very excited about this post because I have been adding lots of products to my makeup collection. This week I present you with a lipstick review that comes with additional savings in time for the holidays!
So Wet n Wild - I. love. their. lipsticks. LOVE! Eeeet! I can't contain my excitement. I love lipstick in general, but I love their lipsticks for a few reasons:
1. They have 5 different lines of lipsticks.
2. Their lipsticks come in really beautiful colors.
3. YOU CAN'T BEAT THE PRICE!
If you are the kind of girl that doesn't really wear makeup, but maybe you put some lipstick on for special occasions, then Wet n Wild is for you. With the holidays just around the corner, even with all the shopping you have to do, treating yourself to some new, AFFORDABLE lipstick is a great way to prepare for all of the family gatherings and holiday parties you may be attending. So I wrote a review for you. Like to hear it? Here it go...
Below is part of my Wet n Wild lipstick collection. I've included one example from each line:
 Pictured l-r: Fergie's Center Stage Collection Perfect Pout Lip Color in Ferguson Crest Cabernet, Mega Shield Lip Color in It's a Girl, Silk Finish Lipstick in Hot Paris Pink and Mega Last Lip Color in Cherry Picking. Front: Perfect Pair Lip Wand in Brandy Wine.
Here's the color swatches:

Fergie's Perfect Pout Lip Color comes in 10 really pretty shades. They glide on a little thick, almost velvety, but the full coverage lasts on your lips throughout the day. I touch up after lunch. They retail for $3.49.
The Mega Shield Lip Color is my favorite in the line. There are 14 shades and I own two of them, It's a Girl and Within These Adobe Walls. These go on a sheerer than the rest, but the colors are really pretty and you do not need to wear any gloss. They retail for $2.99.
The Silk Finish Lipstick is $.99! Twenty-two shades! Its very silky smooth, very hydrating and glides right on.
The Mega Last Lip Color has the most options of the bunch with 26 shades. Wet n Wild boasts that this lasts for four hours, but honestly, it lasts longer than that. Of all the lines, the Mega Last line is the hardest, thickest to apply. I always put lip balm on before so I can actually stroke it on my lips, if not, you have to pat it. But it stays put because it pretty much stains your lips. This will cost you a whopping $1.99.
Last, but not least, is the Perfect Pair Lip Wand, which is awesome because one side is the lip liner and the other is the lipstick in a crayon-like form. This is $3.99, the most expensive of the lot, however its a two-fer so it really is a deal. The only down side to this is that they only offer 4 shades. I'm not real fond of the color I have, Brandy Wine, but I put another color over it to lighten it a bit so I still wear it often.
Now for the best part - Wet n Wild products are 40% off this week at Rite Aid. I bought lipsticks for $.59 today. Paying $.99 is a steal but $.59 is highway robbery.
I can't say enough about the beautiful color selection from Wet n Wild. I must say, they've come a long way since I was a teen and their prices are terrific. So go buy a new Wet n Wild lipstick. Hell, live a little and buy two! If you get one this week at Rite Aid, you won't be paying more than $3.20. If you don't like it, you can always return it, or you can use my little trick and mix it with something else. With 76 colors and 5 different types to choose from, I'm sure you'll find one you love. Or two or three (like I did).
Enjoy the week, bellas! Let me know if you buy one and what you think by commenting below.
So Wet n Wild - I. love. their. lipsticks. LOVE! Eeeet! I can't contain my excitement. I love lipstick in general, but I love their lipsticks for a few reasons:
1. They have 5 different lines of lipsticks.
2. Their lipsticks come in really beautiful colors.
3. YOU CAN'T BEAT THE PRICE!
If you are the kind of girl that doesn't really wear makeup, but maybe you put some lipstick on for special occasions, then Wet n Wild is for you. With the holidays just around the corner, even with all the shopping you have to do, treating yourself to some new, AFFORDABLE lipstick is a great way to prepare for all of the family gatherings and holiday parties you may be attending. So I wrote a review for you. Like to hear it? Here it go...
Below is part of my Wet n Wild lipstick collection. I've included one example from each line:

Here's the color swatches:

L-r: Brandy Wine, Ferguson Crest Cabernet, It's a Girl, Hot Paris Pink and Cherry Picking
Fergie's Perfect Pout Lip Color comes in 10 really pretty shades. They glide on a little thick, almost velvety, but the full coverage lasts on your lips throughout the day. I touch up after lunch. They retail for $3.49.
The Mega Shield Lip Color is my favorite in the line. There are 14 shades and I own two of them, It's a Girl and Within These Adobe Walls. These go on a sheerer than the rest, but the colors are really pretty and you do not need to wear any gloss. They retail for $2.99.
The Silk Finish Lipstick is $.99! Twenty-two shades! Its very silky smooth, very hydrating and glides right on.
The Mega Last Lip Color has the most options of the bunch with 26 shades. Wet n Wild boasts that this lasts for four hours, but honestly, it lasts longer than that. Of all the lines, the Mega Last line is the hardest, thickest to apply. I always put lip balm on before so I can actually stroke it on my lips, if not, you have to pat it. But it stays put because it pretty much stains your lips. This will cost you a whopping $1.99.
Last, but not least, is the Perfect Pair Lip Wand, which is awesome because one side is the lip liner and the other is the lipstick in a crayon-like form. This is $3.99, the most expensive of the lot, however its a two-fer so it really is a deal. The only down side to this is that they only offer 4 shades. I'm not real fond of the color I have, Brandy Wine, but I put another color over it to lighten it a bit so I still wear it often.
Now for the best part - Wet n Wild products are 40% off this week at Rite Aid. I bought lipsticks for $.59 today. Paying $.99 is a steal but $.59 is highway robbery.
I can't say enough about the beautiful color selection from Wet n Wild. I must say, they've come a long way since I was a teen and their prices are terrific. So go buy a new Wet n Wild lipstick. Hell, live a little and buy two! If you get one this week at Rite Aid, you won't be paying more than $3.20. If you don't like it, you can always return it, or you can use my little trick and mix it with something else. With 76 colors and 5 different types to choose from, I'm sure you'll find one you love. Or two or three (like I did).
Enjoy the week, bellas! Let me know if you buy one and what you think by commenting below.
Sunday, September 22, 2013
My "Steal of the Week"
Happy fall, y'all! It's my favorite time of the year - cool weather, football, comfort foods, and pumpkin-flavored everything. While I'm gearing up for a new quarter in graduate school that starts tomorrow, I have been having fun testing all kinds of products for you guys and I can't wait to share them with you.
This week, I must draw your attention to a product that my fabulous cousin and faccia bella, Julia Gerson, commented about on my "If the eyes are the windows to your soul" blog. Urban Decay's 24/7 Glide-on Eye Pencils are $19.00. Outrageous for eye liner, right? I think so, too.
But this is what I learned about this award-winning and blogger-favorite eye liner - IT DOES NOT MOVE! Once you put it on, you have about 30 seconds to blend it, smudge it or fix it, and then it stays put. ALL DAY LONG.
It's actually pretty amazing. But I wasn't too keen on spending $19.00 for one pencil, until last week I hit the mother lode. Roaming around Ulta, I found this:
 This "Black Market" set is considered "travel-sized", as the pencils are not as large as the normal, $19.00 pencils, but for $36.00, you get six colors, all of which, are staple colors for me. Below are the swatches on my hand.

The first color is called West, which is a pretty brown with gold shimmer. Desperation is the next color, which is a matte gray. Black Market is black, and Riot is a shimmery purple. Apathy is a very pretty, shimmery green, like a khaki-green and Ink is navy blue, a dead-ringer for my all-time favorite MAC pencil, Blooz.
I thought this was a great find, specifically because these six colors are colors that I use the most to line my eyes. You can learn more about this product and buy it here (second row, center).
Urban Decay also has some vintage colors, regular size, on sale for $6.00. You can see the colors and purchase them here.
If you have tried Urban Decay's 24/7 Glide-on Eye Pencil, please comment below and let me know your thoughts. If you'd like to try this eye liner out for yourself before you purchasing, you can visit any Ulta or Sephora store near you.
Also, please check out Julia's Facebook page, "Makeup by Julia". She's extremely talented and I hope to do a video with her one day soon for you guys.
Now please excuse me, I have to go scrub my hand to get these swatches off! Have a great week, everyone!
This week, I must draw your attention to a product that my fabulous cousin and faccia bella, Julia Gerson, commented about on my "If the eyes are the windows to your soul" blog. Urban Decay's 24/7 Glide-on Eye Pencils are $19.00. Outrageous for eye liner, right? I think so, too.
But this is what I learned about this award-winning and blogger-favorite eye liner - IT DOES NOT MOVE! Once you put it on, you have about 30 seconds to blend it, smudge it or fix it, and then it stays put. ALL DAY LONG.
It's actually pretty amazing. But I wasn't too keen on spending $19.00 for one pencil, until last week I hit the mother lode. Roaming around Ulta, I found this:
The first color is called West, which is a pretty brown with gold shimmer. Desperation is the next color, which is a matte gray. Black Market is black, and Riot is a shimmery purple. Apathy is a very pretty, shimmery green, like a khaki-green and Ink is navy blue, a dead-ringer for my all-time favorite MAC pencil, Blooz.
I thought this was a great find, specifically because these six colors are colors that I use the most to line my eyes. You can learn more about this product and buy it here (second row, center).
Urban Decay also has some vintage colors, regular size, on sale for $6.00. You can see the colors and purchase them here.
If you have tried Urban Decay's 24/7 Glide-on Eye Pencil, please comment below and let me know your thoughts. If you'd like to try this eye liner out for yourself before you purchasing, you can visit any Ulta or Sephora store near you.
Also, please check out Julia's Facebook page, "Makeup by Julia". She's extremely talented and I hope to do a video with her one day soon for you guys.
Now please excuse me, I have to go scrub my hand to get these swatches off! Have a great week, everyone!
Monday, September 16, 2013
Eyelash Mojo
Hello, faccia bellas! It was a long, trying summer quarter in grad school, but now I'm back and blogging with vengeance.
I have been all about mascara lately. I've been testing some different ones and my eyelashes have got some major mojo going on. I'm batting them all over South Jersey.
"Deanna," you say. "Please tell us the secret!"
Here's my arm. Twist it. Alright I'll tell you! (said in Danny Zuko fashion).
In my quest for getting the longest lashes possible, I found the absolute BEST mascara in the whole wide world. I didn't find it at Walgreens. I didn't find it at CVS. I didn't find it a Target, either. My discovery came at Sephora (big surprise). It was recommended to me by a sales girl (sorry, I don't have an entertaining story about it), and it is worth every penny of the $23.00 I spent.
"TWENTY-THREE DOLLARS FOR MASCARA!" some of you may be crying.
My response, "IT'S WORTH EVERY PENNY!"
It's called They're Real! Mascara by benefit, and the first time I put it on, I actually saw my eyelashes lengthen before my very own eyes. It got the name because people will not believe that you aren't wearing falsies.
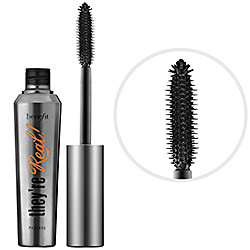
Click here to read reviews on Sephora.com. I found out yesterday that Ulta carries it also.
Now, if you do not want to spend $23.00 on mascara, that is understandable. My drug store suggestion?
L'Oreal Telescopic Carbon Black, as recommended by one of my favorite beauty gurus, Carli Bybel. Walgreens sells it for $9.99 and L'Oreal makes a couple different versions of it, but I found that it lengthens the lashes very well.

If you'd like to see for yourself how it works, click here to see Carli Bybel's tutorial. I do not put on as many coats as she does, but it gives you a good idea of how the product works.
I use both of these products and can attest to their lengthening abilities. Both also claim to add volume to your lashes, and I guess they do, but not enough for me. So I discovered a trick. Another one of my favorite beauty blogs is Makeup Geek.com and Marlena loves to use L'Oreal Voluminous Carbon Black. Based on her recommendation, I purchased it at Target for $5.89.

Does it add volume? Absolutely. However it does not lengthen at all. When I put it on, it was a big let-down in the length department. But because I'm a grad student, I decided to combine the use of the They're Real!/Telescopic and Voluminous and now my lashes are long, full and pretty, the way I like them.
Finally, I owe my eyelash mojo to another great product - Maybelline Great Lash limited edition colored mascaras.
 If you reading this and thinking "that's for 15-year-olds", hear me out. I picked one up at Walgreens for $5.99 the other day just to see how this would look. I was afraid it would be too bright, too Halloween-looking. I was afraid I'd look like a woman trying to look 15, but I chose Vision in Violet to make my brown eyes pop. The Verdict? LOVE IT!!!! Here's why: this is perfect for brightening your eyes without having to wear any eyeliner. If you are a low maintenance kind of girl and don't have time in the morning to do up your eyes, this is a great option. It doesn't come out super-bright, which pleased me. In fact, I put a bunch of coats on to get the look I wanted. I also like the brush because its small enough to get the lower lashes without smudging all over your lower lid. And you can't beat the price.
So there you have it. If you want your eyelashes to have mojo, I recommend all of the above. If you try one or any of these, please let me know your thoughts. If you have your own eyelash mojo, please share your recommendations in the comment section below.
I have been all about mascara lately. I've been testing some different ones and my eyelashes have got some major mojo going on. I'm batting them all over South Jersey.
"Deanna," you say. "Please tell us the secret!"
Here's my arm. Twist it. Alright I'll tell you! (said in Danny Zuko fashion).
In my quest for getting the longest lashes possible, I found the absolute BEST mascara in the whole wide world. I didn't find it at Walgreens. I didn't find it at CVS. I didn't find it a Target, either. My discovery came at Sephora (big surprise). It was recommended to me by a sales girl (sorry, I don't have an entertaining story about it), and it is worth every penny of the $23.00 I spent.
"TWENTY-THREE DOLLARS FOR MASCARA!" some of you may be crying.
My response, "IT'S WORTH EVERY PENNY!"
It's called They're Real! Mascara by benefit, and the first time I put it on, I actually saw my eyelashes lengthen before my very own eyes. It got the name because people will not believe that you aren't wearing falsies.
Click here to read reviews on Sephora.com. I found out yesterday that Ulta carries it also.
Now, if you do not want to spend $23.00 on mascara, that is understandable. My drug store suggestion?
L'Oreal Telescopic Carbon Black, as recommended by one of my favorite beauty gurus, Carli Bybel. Walgreens sells it for $9.99 and L'Oreal makes a couple different versions of it, but I found that it lengthens the lashes very well.
If you'd like to see for yourself how it works, click here to see Carli Bybel's tutorial. I do not put on as many coats as she does, but it gives you a good idea of how the product works.
I use both of these products and can attest to their lengthening abilities. Both also claim to add volume to your lashes, and I guess they do, but not enough for me. So I discovered a trick. Another one of my favorite beauty blogs is Makeup Geek.com and Marlena loves to use L'Oreal Voluminous Carbon Black. Based on her recommendation, I purchased it at Target for $5.89.
Does it add volume? Absolutely. However it does not lengthen at all. When I put it on, it was a big let-down in the length department. But because I'm a grad student, I decided to combine the use of the They're Real!/Telescopic and Voluminous and now my lashes are long, full and pretty, the way I like them.
Finally, I owe my eyelash mojo to another great product - Maybelline Great Lash limited edition colored mascaras.
So there you have it. If you want your eyelashes to have mojo, I recommend all of the above. If you try one or any of these, please let me know your thoughts. If you have your own eyelash mojo, please share your recommendations in the comment section below.
Monday, June 10, 2013
My Lipstick Movie Moment
Have you ever had one of those moments where something happens to you and you think, If I were in a movie, this is the part where background music would play. I have lots of those moments in my life. I'm a big movie buff, and I tend to dabble on the dramatic side. Here's a movie moment that coincided with my favorite new lipstick technique. Stay with me.
Every girl has a tube of lipstick, right? You may not wear it everyday, but you at least have one for special occasions. Check your lipstick. What color do you have? Now I have more than one tube of lipstick, but my go-to color is pink. I have many versions of pink lipstick; bright pink, light pink, pale pink, dark pink, the list goes on. Often when I'm looking for new lipstick I think, I need a new color, and I proceed to look at the same old pinks. Probably because aside from pink and nude, I don't know how to wear other colors. Peach and orange can be tricky to wear depending on your skin tone, and while I love purple, I have never had the courage to wear it.
Until a few weeks ago.
Once again I was strutting through Macy's (not a movie music moment) and I stopped at the MAC counter (the lights, colors and fabulousness of it all sucks me in, every time). On this day, I stood in front of the lipstick display, wanting something different and testing at least 12 colors on my hand. All of which were pink.
Another MAC angel with beautiful, shimmery, high cheek bones approached me. His name was Zac. I told him I wanted a different lipstick. He suggested two colors that I already had (pink). But there, in the middle of all of those tubes of colors, was this lovely, lavender. It was entirely too bright, almost doll-like, the kind Barbie would wear, and not suitable for everyday. The kind I never had the guts to try. Its name was Up the Amp, and the irony was not lost on me. I had to try it. Zac took it out, cleaned it off and encouraged me to put it on. So I did what every normal girl would do, I swiped it heavily on both my lips. It looked like this:
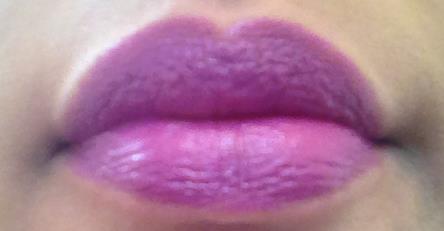
Zac rolled his eyes at me and said, "Let's get a lip liner."
Here we go with the up-sell, I thought. He's gonna get me lip liner and a gloss (I hate lip gloss) and encourage me to buy all three.
"Wipe that off, " he said, handing me a moist towelette. In his hands he had - what did I tell you - not just a lip liner, but a gloss as well. He proceeded to line and color in my entire top lip with the liner, called Plum, which was darker than the lip stick. Then he lined just the sides of my bottom lip. Just the sides? Not the whole lip? I was confused. "Trust me," he said.
He handed me the lipstick and instructed me to gently pat the color only on my lower lip, no swiping, and rub my lips together. In my head I was like, huh? but I did as I was told. He then handed me this shimmery, pinky gloss, called Nymphette.
"This is my favorite gloss ever," he told me. "Now dab a little bit of this on your lower lip and just press your lips together once."
I obliged.
"GORGEOUS!" was his response. It looked like this:

I was amazed. I never would have put these colors together, never would have lined my lips they way he instructed, never would have worn the gloss. It was subtle, beautiful, and not pink.
"OK," I sighed. "I'll take all three."
Sucker, my inner-Deanna said.
After I left MAC with my gorgeous, new purple lips, I went to Sephora, MAC's arch nemesis, for some facial wash. As I was leaving the store, one of their makeup experts was standing at the makeup vanity in the front of the store. As I passed her, she said, "Your lipstick looks gorgeous."
I thanked her and tossed my head back, laughing as I walked out.
Que the music.
Do you have any lipstick tricks like this? Share your tips below or try this technique and let me know how it works for you!
Also, CLICK HERE for another awesome lip liner/gloss trick from my favorite blog, Makeup Geek!
Every girl has a tube of lipstick, right? You may not wear it everyday, but you at least have one for special occasions. Check your lipstick. What color do you have? Now I have more than one tube of lipstick, but my go-to color is pink. I have many versions of pink lipstick; bright pink, light pink, pale pink, dark pink, the list goes on. Often when I'm looking for new lipstick I think, I need a new color, and I proceed to look at the same old pinks. Probably because aside from pink and nude, I don't know how to wear other colors. Peach and orange can be tricky to wear depending on your skin tone, and while I love purple, I have never had the courage to wear it.
Until a few weeks ago.
Once again I was strutting through Macy's (not a movie music moment) and I stopped at the MAC counter (the lights, colors and fabulousness of it all sucks me in, every time). On this day, I stood in front of the lipstick display, wanting something different and testing at least 12 colors on my hand. All of which were pink.
Another MAC angel with beautiful, shimmery, high cheek bones approached me. His name was Zac. I told him I wanted a different lipstick. He suggested two colors that I already had (pink). But there, in the middle of all of those tubes of colors, was this lovely, lavender. It was entirely too bright, almost doll-like, the kind Barbie would wear, and not suitable for everyday. The kind I never had the guts to try. Its name was Up the Amp, and the irony was not lost on me. I had to try it. Zac took it out, cleaned it off and encouraged me to put it on. So I did what every normal girl would do, I swiped it heavily on both my lips. It looked like this:
(Disclaimer: Lips really are as large as they appear and taking pictures of your lips is hard. Capturing the correct color of the lipstick with bad lighting is harder. So while you may not see a big difference, trust me and trust Zac, in person, there is.)
Here we go with the up-sell, I thought. He's gonna get me lip liner and a gloss (I hate lip gloss) and encourage me to buy all three.
"Wipe that off, " he said, handing me a moist towelette. In his hands he had - what did I tell you - not just a lip liner, but a gloss as well. He proceeded to line and color in my entire top lip with the liner, called Plum, which was darker than the lip stick. Then he lined just the sides of my bottom lip. Just the sides? Not the whole lip? I was confused. "Trust me," he said.
He handed me the lipstick and instructed me to gently pat the color only on my lower lip, no swiping, and rub my lips together. In my head I was like, huh? but I did as I was told. He then handed me this shimmery, pinky gloss, called Nymphette.
"This is my favorite gloss ever," he told me. "Now dab a little bit of this on your lower lip and just press your lips together once."
I obliged.
"GORGEOUS!" was his response. It looked like this:
"OK," I sighed. "I'll take all three."
Sucker, my inner-Deanna said.
After I left MAC with my gorgeous, new purple lips, I went to Sephora, MAC's arch nemesis, for some facial wash. As I was leaving the store, one of their makeup experts was standing at the makeup vanity in the front of the store. As I passed her, she said, "Your lipstick looks gorgeous."
I thanked her and tossed my head back, laughing as I walked out.
Que the music.
Do you have any lipstick tricks like this? Share your tips below or try this technique and let me know how it works for you!
Also, CLICK HERE for another awesome lip liner/gloss trick from my favorite blog, Makeup Geek!
Tuesday, June 4, 2013
Loved it, tried it! My first attempt at recreating a look I love!
Hello, dahlings! A couple of weeks ago, I posted the link to one of my favorite makeup blogs, The Beauty Bybel. Check it out on my new blog roll on the right side of the page. I just added it this week. (I'm starting to get the hang of of this here blogging thingy!) Carli Bel also has an extensive video collection on YouTube, where she demonstrates how to achieve certain makeup looks. She has inspired me to come up with the segment of my blog entitled: Loved It, Tried It. Periodically, I will try to recreate looks that I love based on pictures or videos that I see. Hopefully they will not turn out to be like the epic fails on Pinterest. You know the stuff that people try at home because Pinterest makes it look so easy, but instead it looks like this:

Let's hope I have some better luck.
For this week's look, I posted a link to Carli's video below. I know this is more of a look to wear in the fall, with the gold and brown, but I wanted to try it out and see if I could do this.While I did not use all the exact same products that she used, (I made due with some things I already have), I did follow her instructions step by step. I will list the products that I used below, and after that you can see my first video I have ever done, showing you the results.
View Carli's video here.
In order to recreate this look, I used the following items:

Maybelline EyeStudio Quad in Give Me Gold
MAC Eye Shadows from left to right: Black Tied, Bamboo, Nylon
Revlon Photoready Eye Primer and Brightener
Loreal Voluminous Carbon Black Mascara
Milani Shadow Eyez in Green Safari
Maybelline Eyestudio Gel Eyeliner in Blackest Black
First I primed my eye lid with Revlon's Photoready Eye Primer and Brightener. I sometimes wear this even when I don't wear eyeshadow, because it does brighten up around my eyes and helps hide my dark circles. Just like Carli, I used the Maybelline Eyestudio quad in Give me Gold. I used the gold color all over my lid. Following her steps, in the crease I used MAC's eye shadow in Bamboo. Then I used MAC's eye shadow, Black Tied in the outer "v" crease, instead of the black eye shadow pencil she used. I then used the bronze color from the Maybelline quad in my crease to blend. I then used MAC's Nylon eye shadow to highlight my tear duct and brow bone. I did not add any additional gold sparkle or the fake eye lashes, although I'm a huge fan of eye lashes. I think they really add drama to the eyes and I always wear them for special occasions. Instead of the green eye shadow, I used Milani's Shadow Eyez pencil in green safari, I drew it on my lower lash line and blended it with an angled brush. Maybelline's Eyestudio Gel Eyeliner was used on my upper lids.
My thoughts on the outcome? I have to say, it looks much better in person than it does on my video below. I don't think you really get to see the green on my lower lids, but I think that is because of the lighting - something I'll have to work on for future videos. The look was easy to achieve, and like Carli mentions in her video, more appropriate for a night out. And I definitely need to get some glittery pigments for that extra sparkle. So check it out and let me know what you think!
See my final look here
Tuesday, May 28, 2013
If the eyes are the windows to your soul, at least make them look pretty! Eye liner reviews and tips.
Happy Memorial Day! This weekend, many stores are having sales, so I decided to give you a Memorial Day twofer - eye liner product reviews and a tip on how to make eye liner last.
I love eye liner - it is a staple in my everyday makeup routine. I like it because it gives your eye a pop of color and takes seconds to apply. Paired with some mascara, it gives me a look I'm comfortable wearing to work without feeling like I'm all done up with eye shadow. I reserve eye shadow for the weekends and nights out, but that's only because applying eye shadow takes more time than I'm willing to spend primping in the morning before work (the truth is, I like to sleep until the last possible minute).
There are many different types of eye liner and different techniques to apply it. You can put it on your lower lash line, your upper lash line, and in your water lines, which is the wet ridge where your eye and eye lid come together. Be careful when lining your water lines. Use pencil only, and do not share a pencil with someone else, as you can get an infection.
See below for my thoughts on the following liquid eye liners. I use them solely for my upper lids, to give a really defined look. This type of liner is not made for the "smudged" look; that is reserved for pencils and eye shadow.

This is Urban Decay's 24/7 Waterproof Liquid Liner. It retails for $19.00 at Sephora. This liquid liner is applied with a brush and went on nice, smooth and dark. It lasted all day long. In fact, when it was time to take it off, even after I washed my face, it was still fully on. I actually had to peel in off of my lid like plastic and it came off in one piece. The one thing that I did not like about it was that, the closer I applied it to my upper lash line, the stickier it made my eyelashes. I had a hard time applying my mascara because my eyelashes were stuck together at the base.

This is Revlon's Color Stay Liquid Eye Pen. Target sells it for $7.79. This pen has a felt tip, like a marker, and also draws on easily. This also lasts all day long, however, once you put it on, you have to let it dry a little bit before you curl your lashes. Each time I curl my lashes, it tends to get on the lash curler, and then it looks faded on my eye lid. I then have to reapply it. This comes in three colors: blackest black, black and blackened brown.

This is Maybelline's Master Duo Thin or Thick Glossy Liquid Liner. This applicator is felt and has a little ball on the end of it. Their brown color is called Bronze Shimmer, and I don't like it. It was too bronze and not enough brown for me. It went on easily, but like the Urban Decay eye liner, it stuck to the base of my lash line causing my eyelashes to stick together. They were dry and hard when I tried to put on my mascara. This one was my least favorite. It comes in six colors, black, purple, teal, green, navy and bronze and retails for $6.94 at Target.

As far as eye liner pencils go, there are so many to choose from. The following are my go-to eyeliners, and my all-time favorite.

The Wet n Wild brow and eye liner pencils are great because they come in a bunch of colors and the pencils are extremely long, so they last forever. The best part is they are only $0.99! You cannot beat the price. There is one problem with these pencils, they tend to run and smudge around your eyes, especially the bottom lid. But I have a great tip to keep that from happening. I'll get to that in a second.

This is my number one, all-time favorite eye liner in the history of the universe! This prized possession was given to me on that fateful day in Macy's at the MAC counter that I told you about last week. That darling makeup angel, whoever she was, gave me this MAC Kohl eye pencil in the color Blooz. It is a navy pencil, and it is the best navy pencil I have ever tried. I've tried a lot of pencils claiming to be navy, but they were really bright, and just not the deep navy color I was looking for. Navy is great at accentuating brown eyes and this pencil will last all day long. In fact, even after I wash my face, I usually need to get an Almay makeup eraser stick to really get it all off. This kohl pencil is $16.00 and worth every penny.
I hope these product reviews were helpful. Before I go, I'll leave you with a great tip that I found on Pinterest about how to keep your eye liner from running and smudging under your eyes. After applying your eye liner, you take a small, flat concealer brush and some pressed powder. I use Cover Girl's Oil Control Pressed Powder which is $5.94 at Target.

I run the tip of the brush against the powder and dust it under the eye liner, like I'm drawing a line of powder under the liner, but you cannot see the powder. This works wonders. For years, I came home from work at 6:00 p.m. with eye liner all around my eyes, looking like I slept twelve hours in my makeup, especially with the $0.99 eye liner. This little trick restored my confidence in throwing down those Wet n Wild eye liners at the drug store check out. I now have them in every color.
Thank you for tuning in this week. Please leave a comment and let me know what you think. If you have any questions or ideas for me to try, post them. I look forward to testing out new makeup.
Tuesday, May 21, 2013
Inspiration, Tips and Advice
Welcome! If you are reading this, I thank you for visiting my blog. It has been a rough week for me, but I've been putting together some ideas for this blog and I'm excited to start actually researching some products. This week, I thought I'd share with you where I get my inspiration, the things I can't live without, and some tips on how to get started learning on your own.
A few years ago, I became really interested in learning more about makeup, specifically eye shadow, and how to apply it. Until that time I was buying drug store eye shadows, the ones that come four to a case and following the instructions on the back. But I wanted to expand my horizons. One day on a trip to Macy's, a light was beckoning me toward it. It looked like this:

Hesitant and intimidated, I let it draw me closer. There were pretty colors everywhere. There were lipsticks and lip glosses and blushes! The eye shadow displays were color coordinated, but each color was sold separately. Wait, what? How do I know which colors to wear? How do I know where to put them on my eyelid? I longed for inspiration, knowledge, and assistance. Then an angel in beautiful, colorful makeup appeared. She didn't know it yet, but like many sales people I encounter, she would be sorry she approached me. I talked her ear off for an hour and a half, trying to suck her dry of her makeup knowledge. It was silly of me to think that I would learn everything in 90 minutes. But she was wonderful and she assisted me in how to pick out eye shadow colors, the proper tools to use and as she applied it on me, she talked me through it, step by step. I bought everything she suggested and I walked away anticipating my next trip.
That's how it started for me. When Sephora opened in my area, I was thrilled. MORE MAKEUP! Sephora sells over 200 different brands of beauty products and the sales people are knowledgable. The possibilities are endless. The best part about MAC and Sephora and department store makeup counters is, unlike drug stores, you get to test out the products before you purchase them. Of course the pricing is substantially different, but in some cases, the product quality is better.
Then came Pinterest. Pinterest has ruined my life. I pin everyday. Their Hair and Beauty board has only made it harder for me to stay away from MAC, Sephora and drug stores. Through Pinterest, I discovered two makeup blogs, Makeup Geek and The Beauty Bybel. These blogs have how-to videos that have since encouraged my makeup obsession. Please check them out, I've included their links below.
Click here for Makeup Geek
Click here for The Beauty Bybel
These stores and sites have taught me some tried and true lessons. I'd like to share some of my basic, general makeup must-haves with you.
There are a few products that I cannot live without when it comes to makeup. Each will be discussed in further detail in upcoming posts, but I want to mention them today because I think they are important. They are:
Primer - for the face and for the eyes. Primer is a cream that goes on your face or eyelids before you put on any foundation or eye shadow. This helps your foundation and eye shadow last longer, no matter the quality of the makeup. I wear face primer every day and I wear eye primer whenever I'm wearing eye shadow.
Makeup brushes - these are essential if you want your makeup to look smooth and natural. There are many different types of brushes for the face and eyes. I have quite a few, but not every type. Brushes help blend your makeup. It is all about blending! Please throw away those eyeshadow sticks that come with the drug store eye shadow and invest in some brushes. MAC and Sephora sell professional brushes, but you can also get them at any drugstore for a reasonable price and they will last if you keep them clean. I will talk about this, also. Stay tuned!
Makeup remover towelettes and eraser sticks - these are great. One rule I have always upheld is to never, ever go to bed without washing off my makeup. The towelettes are wonderful for helping remove heavy makeup and you can use them all over your face. I love Target's brand, they are only $3.64 and I use them everyday. Almay's makeup eraser sticks retail for $4.89 and they are my number one favorite thing. They look like cotton swabs, but they have makeup remover in the stick part of it. You snap off the one end and the liquid drains into the end with the remaining swab. I used these to help erase mistakes with eye shadow, mascara and eye liner, or I use them to take off the tough eyeliner that soap just doesn't get.
Bronzer - what can I say? I'm a Jersey girl. Bronzer gives you a sun-kissed glow and I wear it all year long. If you look like this

then you've used it incorrectly. Bronzer is applied to the places that the sun would naturally hit, your forehead, cheeks, nose and chin.
My advice for anyone interested in upping their makeup routine is to check out the links I posted, there are so many great tips and product recommendations on them. I have purchased some of the products they recommend and I am working on some product reviews for you. So be sure to check back here each week. I also recommend visiting MAC and Sephora and the department stores where there are people there to help answer your questions. Also, know that if you decide to purchase drug store makeup and you don't like it, you can return it. I have done this at Walgreens, CVS, Rite Aid and Target and I have never had a problem.
If you visit the stores and links I provided and are interested in experimenting with new eye shadow colors, but do not want to spend mucho dinero on a few shades, I have the perfect product for you.
 This 144 piece palette by e.l.f. comes in bold and neutral colors, is $15.00 and is perfect for experimenting! Target and Walgreens sold it over the holiday season but it is available on their website. I actually got it for $7.00 at Walgreens on their Christmas clearance shelf. SCORE! Makeup Geek has a review on it, also. I suggest using eye primer, it will last longer.
That's it for this week! Did I talk your ear off? I encourage you to comment, ask questions or give me ideas. Have a great week!
A few years ago, I became really interested in learning more about makeup, specifically eye shadow, and how to apply it. Until that time I was buying drug store eye shadows, the ones that come four to a case and following the instructions on the back. But I wanted to expand my horizons. One day on a trip to Macy's, a light was beckoning me toward it. It looked like this:
Hesitant and intimidated, I let it draw me closer. There were pretty colors everywhere. There were lipsticks and lip glosses and blushes! The eye shadow displays were color coordinated, but each color was sold separately. Wait, what? How do I know which colors to wear? How do I know where to put them on my eyelid? I longed for inspiration, knowledge, and assistance. Then an angel in beautiful, colorful makeup appeared. She didn't know it yet, but like many sales people I encounter, she would be sorry she approached me. I talked her ear off for an hour and a half, trying to suck her dry of her makeup knowledge. It was silly of me to think that I would learn everything in 90 minutes. But she was wonderful and she assisted me in how to pick out eye shadow colors, the proper tools to use and as she applied it on me, she talked me through it, step by step. I bought everything she suggested and I walked away anticipating my next trip.
That's how it started for me. When Sephora opened in my area, I was thrilled. MORE MAKEUP! Sephora sells over 200 different brands of beauty products and the sales people are knowledgable. The possibilities are endless. The best part about MAC and Sephora and department store makeup counters is, unlike drug stores, you get to test out the products before you purchase them. Of course the pricing is substantially different, but in some cases, the product quality is better.
Then came Pinterest. Pinterest has ruined my life. I pin everyday. Their Hair and Beauty board has only made it harder for me to stay away from MAC, Sephora and drug stores. Through Pinterest, I discovered two makeup blogs, Makeup Geek and The Beauty Bybel. These blogs have how-to videos that have since encouraged my makeup obsession. Please check them out, I've included their links below.
Click here for Makeup Geek
Click here for The Beauty Bybel
These stores and sites have taught me some tried and true lessons. I'd like to share some of my basic, general makeup must-haves with you.
There are a few products that I cannot live without when it comes to makeup. Each will be discussed in further detail in upcoming posts, but I want to mention them today because I think they are important. They are:
Primer - for the face and for the eyes. Primer is a cream that goes on your face or eyelids before you put on any foundation or eye shadow. This helps your foundation and eye shadow last longer, no matter the quality of the makeup. I wear face primer every day and I wear eye primer whenever I'm wearing eye shadow.
Makeup brushes - these are essential if you want your makeup to look smooth and natural. There are many different types of brushes for the face and eyes. I have quite a few, but not every type. Brushes help blend your makeup. It is all about blending! Please throw away those eyeshadow sticks that come with the drug store eye shadow and invest in some brushes. MAC and Sephora sell professional brushes, but you can also get them at any drugstore for a reasonable price and they will last if you keep them clean. I will talk about this, also. Stay tuned!
Makeup remover towelettes and eraser sticks - these are great. One rule I have always upheld is to never, ever go to bed without washing off my makeup. The towelettes are wonderful for helping remove heavy makeup and you can use them all over your face. I love Target's brand, they are only $3.64 and I use them everyday. Almay's makeup eraser sticks retail for $4.89 and they are my number one favorite thing. They look like cotton swabs, but they have makeup remover in the stick part of it. You snap off the one end and the liquid drains into the end with the remaining swab. I used these to help erase mistakes with eye shadow, mascara and eye liner, or I use them to take off the tough eyeliner that soap just doesn't get.
Bronzer - what can I say? I'm a Jersey girl. Bronzer gives you a sun-kissed glow and I wear it all year long. If you look like this
then you've used it incorrectly. Bronzer is applied to the places that the sun would naturally hit, your forehead, cheeks, nose and chin.
My advice for anyone interested in upping their makeup routine is to check out the links I posted, there are so many great tips and product recommendations on them. I have purchased some of the products they recommend and I am working on some product reviews for you. So be sure to check back here each week. I also recommend visiting MAC and Sephora and the department stores where there are people there to help answer your questions. Also, know that if you decide to purchase drug store makeup and you don't like it, you can return it. I have done this at Walgreens, CVS, Rite Aid and Target and I have never had a problem.
If you visit the stores and links I provided and are interested in experimenting with new eye shadow colors, but do not want to spend mucho dinero on a few shades, I have the perfect product for you.
That's it for this week! Did I talk your ear off? I encourage you to comment, ask questions or give me ideas. Have a great week!
Saturday, May 11, 2013
Put Some Lipstick On
Hello! Welcome to my first official blog post. I thought I would introduce myself and give you a little background into why I chose to blog about makeup.
Growing up, I was introduced to beauty products at an early age. My mother was my biggest influence because she always took care of herself - her hair was always done, her nails were always painted and she always wore makeup. To this day, she looks fabulous and she's in her fifties. Here she is:
 So, growing up with this goddess, you might imagine that beauty routines were a staple. I can remember being dragged to salons while she got her hair and nails done. Eventually, I think it was fourth grade, I was allowed to get my first perm. Ah, yes, the good old perms from the 80's. They ruined my hair, but I digress.
I've heard a lot of women say they weren't allowed to wear makeup until they were 16 years old. I think I was around 13 when one day I came downstairs and my mother said, "You're going out like that? Go put some lipstick on!" I was the lipstick queen from 8th grade on. I remember one day in the locker room after gym class, one of the girls asked me how my lipstick stayed on all day. I stood in front of the mirror and gave my rigorous application instructions to about 12 girls.
Here's me, at 14. Not the greatest picture, but the red lipstick is noticeable.

I eventually graduated to eyeliner and mascara and as the years passed, my girlfriends would ask me to do their makeup for proms and weddings. I was not a makeup artist, I was just the only one out of my friends that wore makeup daily. I was also the only one of my friends who would get their makeup done professionally for weddings and not rub it off in the car on the way to the church. (Yes, my one girlfriend did that.) Once I was asked by my friend, whose idea of bridesmaid makeup was Bonne Belle lip balm, "Why would you get all that makeup put on your face?" My response was, "I want to look pretty in the pictures, don't you?" I mean, come on, even supermodels look different without makeup. Victoria's Secret supermodel Alessandra Ambrosio is gorgeous without makeup, but it definitely helps enhance her beauty. Don't you think?
 Listen, I'm not a makeup maven. I just take the time to put makeup on everyday and learn more about it as much as I can. This blog is for the novice. I'll talk about basic tips and tricks, try out different looks and review drugstore makeup, as well as some higher end brands from MAC and Sephora. Maybe I'll teach you something, maybe you'll give me some suggestions of things to try, and I'll learn as much as I can. The idea is to share what I know and what I learn, so you can enhance your own faccia bella.
Growing up, I was introduced to beauty products at an early age. My mother was my biggest influence because she always took care of herself - her hair was always done, her nails were always painted and she always wore makeup. To this day, she looks fabulous and she's in her fifties. Here she is:
I've heard a lot of women say they weren't allowed to wear makeup until they were 16 years old. I think I was around 13 when one day I came downstairs and my mother said, "You're going out like that? Go put some lipstick on!" I was the lipstick queen from 8th grade on. I remember one day in the locker room after gym class, one of the girls asked me how my lipstick stayed on all day. I stood in front of the mirror and gave my rigorous application instructions to about 12 girls.
Here's me, at 14. Not the greatest picture, but the red lipstick is noticeable.
I eventually graduated to eyeliner and mascara and as the years passed, my girlfriends would ask me to do their makeup for proms and weddings. I was not a makeup artist, I was just the only one out of my friends that wore makeup daily. I was also the only one of my friends who would get their makeup done professionally for weddings and not rub it off in the car on the way to the church. (Yes, my one girlfriend did that.) Once I was asked by my friend, whose idea of bridesmaid makeup was Bonne Belle lip balm, "Why would you get all that makeup put on your face?" My response was, "I want to look pretty in the pictures, don't you?" I mean, come on, even supermodels look different without makeup. Victoria's Secret supermodel Alessandra Ambrosio is gorgeous without makeup, but it definitely helps enhance her beauty. Don't you think?
Subscribe to:
Comments (Atom)